Unstructured to Structured #
The Unstructured to Structured model solution presents a hasslefree way of extracting unstructured data from documents in an efficient manner. This solution allows users to train and finetune them on their own set of documents. This offers an efficient way of extracting important metrics from lengthy and unstructured documents. Leveraging advanced Natural Language Processing (NLP) techniques, the solution implements algorithms for text processing, including tokenization and named entity recognition, ensuring effective handling of diverse bond documents. Leveraging a custom LLM trained on domain-specific data enhances the solution’s performance, enabling it to provide tailored and contextually relevant insights from unstructured bond documents.
Financial institutions, investment firms, and asset management companies can leverage this solution to automate the process of extracting bond terms, yields, maturity dates, and other essential data points from diverse financial documents. Moreover, the solution can be customized and adapted to address specific use cases and industries.
Key features are:
- Facilitates in-depth analysis of bond-related data, enabling stakeholders to uncover valuable insights and make informed decisions.
- Tailored prompts allow users to define specific criteria for extracting insights from documents.
- Customizable training process allows users to fine-tune models based on specific requirements and domain expertise.
- Leveraging pre-trained models enriches the training process and facilitates the extraction of nuanced insights.
Steps for Usage #
Create EC2 Key Pair #
- Navigate to Key Pairs in EC2 Management Console
- Click on Create Key Pair
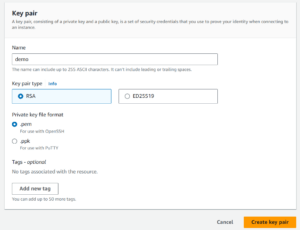
- Set a name (e.g., demo) and select .pem as the key format
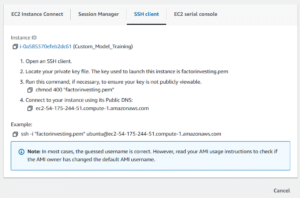
- Deploy the CloudFormation Stack
- Go to the instance
- Click on Connect to Instance
- Click on SSH Client and copy the command containing the example
VSC Setup #
- Click on the Click on the green icon in the bottom-left corner of Visual Studio Code, then select “Remote-SSH: Connect to Host…”.
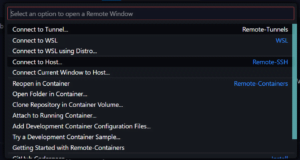
- Click on Add New SSH Host
- Paste the copied command in the pop-up

- Click on the config file to write the details of the current EC2 instance
- Click on Connect once the pop-up comes in bottom right corner
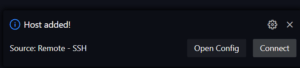
- VSC is connected to the EC2 instance
Make sure you run conda activate py39 if conda env is not activate before any step, always use this kernel in notebooks #
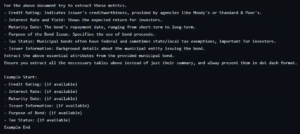
1: Define Custom Prompts #
Navigate to the prompts folder.
Modify the main_prompt.txt file to define custom prompts tailored to your specific use case. Focus on adjusting metrics while keeping the overall content intact.
2: Prepare Documents #
Gather the financial documents that you intend to use for training, like bond prospectus, offering documents, etc. These documents play a crucial role in training the model to extract relevant insights and information related to bonds. Ensure that these documents are in a PDF format and place them in the docs folder in the project directory.
3: Format Data #
Execute the data_creation.ipynb notebook to properly format the data for training the model. This step ensures that your documents are processed in a suitable manner for model training. This step involves a series of processes, namely:
a. Data in PDF Format:
Initially, the financial data is collected and compiled into PDF documents. These documents contain a wealth of information related to bond terms, yields, maturity dates, and other essential details crucial for financial analysis.
b. Data Curated by GPT:
Once the financial documents are in PDF format, they are processed by the GPT (Generative Pre-trained Transformer) model. GPT is employed to curate and extract relevant information from the PDF documents. The model’s natural language processing capabilities enable it to understand the textual content within the PDF files and identify key data points related to bonds.
c. Saving Curated Data:
After curating the financial data, the extracted information is saved or stored in a structured format suitable for model training. This structured data may include labeled examples, input features, target labels, or other metadata essential for training the model effectively.
4: Train and Merge the Model #
Run the train.py script to train the model using the custom documents prepared in the previous step. This trains the model to extract insights based on the defined prompts. The training process is orchestrated within a predefined Amazon EC2 instance, where all the necessary libraries and dependencies are pre-installed for seamless execution.
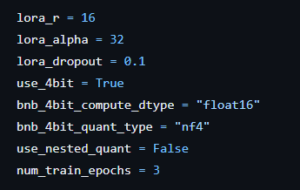
These parameter values provided in the code snippet can be customized and tuned according to specific requirements and expectations. By adjusting these parameters, users can fine-tune the model’s architecture, regularization techniques, and training duration to optimize its performance for their particular use case or dataset.
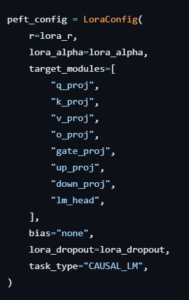
These parameters allow users to customize various aspects of the Lora model’s architecture and training process to adapt it to specific tasks and objectives. Adjusting these parameters can significantly impact the model’s performance and behavior, making them crucial for fine-tuning and optimization.
The snippet provided pertains to quantized training, a technique increasingly adopted in machine learning for efficient model deployment and inference on resource-constrained devices. Quantized training involves training neural networks using low-precision data types, typically with fewer bits than standard floating-point representations, while preserving model accuracy. By reducing the precision of model parameters and activations during training, quantized training significantly reduces memory footprint and computational complexity, enabling faster inference and lower energy consumption.
To train the model, use the following command:
cd <project-directory>/training
python3 train.py --trained_model_name <trained_model_name> --base_model <base_model_name> --dataset <dataset_path>
Arguments: #
--trained_model_name: Specifies the name of the trained model.--base_model: (Optional) Specifies the base model to use for training. Default value is mistralai/Mistral-7B-Instruct-v0.2.--dataset: (Optional) Specifies the path to the dataset to be used for training. Default value is ../training_data/train.jsonl.
Utilize the merge.py script to merge the Lora model with the custom model trained in the previous step.
The merge.py script accepts the following arguments:
To merge and save the fine-tuned model, use the following command: #
cd <project-directory>/training
python3 merge.py --trained_lora <trained_model_name> --base_model <base_model_name> --new_model <new_model_name>
Arguments: #
--trained_lora: Specifies the trained LoRA model to merge. This argument is required.--base_model: (Optional) Specifies the base model to use for merging. Default value is mistralai/Mistral-7B-Instruct-v0.2.--new_model: (Optional) Specifies the name of the new merged model. Default value is mistralai-custom-full.
Ensure you have the required dependencies installed before running the script.
5: Test Model Output #
Explore the model’s output by running the demo_model_output.ipynb and demo_model_output1.ipynb notebooks allowing you to test the model’s functionality. In the model testing step, the trained model is evaluated by applying it to the test dataset to assess its performance and effectiveness in extracting insights from unstructured financial documents. During testing, multiple trained models, including those merged with custom models, may be evaluated to identify the model that achieves the best performance on the test dataset. This iterative process allows for the comparison of different model configurations, hyperparameters, and training techniques to determine the most effective approach for extracting insights from financial documents. Ultimately, the goal of model testing is to select the model that demonstrates the highest performance and reliability in accurately extracting relevant information from unstructured financial documents. This selected model will then be used in the main
6: Review Results #
After completing the steps outlined in the demo notebook, users have two options for running the trained model: either through the main.ipynb Jupyter Notebook or via the app.py script, which utilizes Streamlit for creating a user-friendly interface.
Results Time #
Use this Notebook to use your trained model to compare your results again OpenAI GPT use this notebook
- Once the text content is extracted from the PDF documents, it undergoes a tokenization process within the notebook. This step breaks down the text into smaller units, such as words or subwords, preparing it for further analysis and processing by the trained model.
- Following tokenization, the notebook enables users to input the tokenized text into the trained model for inference. The model processes the text data based on predefined prompts and generates responses or extracts insights relevant to the input.
- Finally, the results obtained from the model are presented within the notebook interface, allowing users to easily view and interpret the extracted insights, responses to queries, or any other relevant outputs.
Streamlit App #
By running streamlit app, users can access the model through a web browser, facilitating intuitive interaction with the model. The Streamlit script provides a convenient and user-friendly interface for interacting with the trained model using Streamlit. The same code structure and functionalities present in main.ipynb are mirrored in app.py, ensuring consistency and familiarity for users transitioning between the notebook environment and the web application.
To start the Streamlit app run
streamlit run app.py --server.port 8888


