Training Llama-2 Model on AWS Trainium
In this blog we will run multi-node training jobs using AWS Trainium accelerators in Amazon EKS. Specifically, you will pretrain Llama-2-7b on 4 AWS EC2 trn1.32xlarge instances using a subset of the RedPajama dataset.
Selecting the Right Llama-2 Model Size
Choosing the appropriate model size of Llama-2 depends on your specific requirements. The largest model might not always be necessary for optimal performance. It’s crucial to consider factors like computational resources, response times, and cost efficiency. Make an informed decision by assessing the needs and limitations of your application thoroughly.
Performance Boost
While Llama-2 can achieve high-performance inference on GPUs, Neuron accelerators take performance to the next level. Neuron accelerators are purpose-built for machine learning workloads, providing hardware acceleration that significantly enhances Llama-2’s inference speeds. This translates to faster response times and improved user experiences when deploying Llama-2 on Trn1 instances.
Solution Architecture
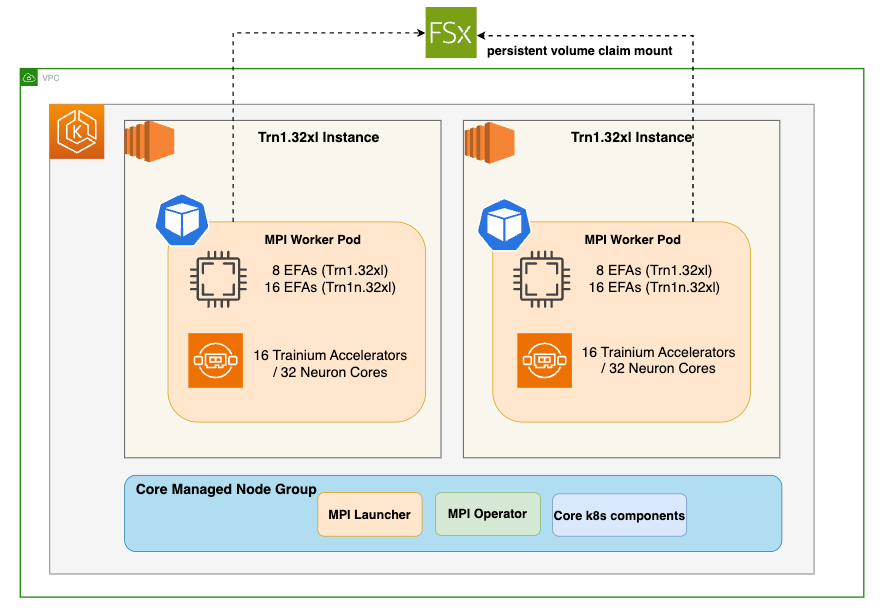
Deploying the Solution
Prerequisites
Before we begin, ensure you have all the prerequisites in place to make the deployment process smooth and hassle-free.
Ensure that you have installed the following tools on your EC2.
- EC2 Instance please ensure you have 100GB+ of storage
- AWS CLI
- kubectl
- Git
- Docker
- terraform
- Python, pip, jq, unzip
Clone the Data on EKS repository
Navigate to the trainium-inferentia directory.
By default MPI operator is not installed and its set to false. We will run the below export commands to set environment variables.
Run the install script to provision an EKS cluster with all the add-ons needed for the solution.
Verify the resources
Verify the Amazon EKS Cluster
Distributed training
Once the EKS Cluster is deployed, you can proceed with the next steps of building neuronx-nemo-megatron container image and pushing the image to ECR.
Build the neuronx-nemo-megatron container image
Navigate to examples/llama2 directory
Run the 1-llama2-neuronx-pretrain-build-image.sh script to build the neuronx-nemo-megatron container image and push the image into ECR.
When prompted for a region, enter the region in which you launched your EKS cluster, above.
Note: The image building and pushing to ECR will take ~10 minutes
Launch and connect to a CLI pod
In this step we need access to the shared FSx storage. To copy files to this storage, we’ll first launch and connect to a CLI pod running the neuronx-nemo-megatron docker image that you created above.
Run the following script to launch the CLI pod:
Next, periodically run the following command until you see the CLI pod go into ‘Running’ state:
Once the CLI pod is ‘Running’, connect to it using the following command:
Download the Llama tokenizer and Redpajama dataset to FSx
From within the CLI pod, we’ll download the Llama tokenizer files. These files are protected by Meta’s Llama license, so you will need to run the huggingface-cli login command to login to Hugging Face using your access token. The access token is found under Settings → Access Tokens on the Hugging Face website.
When prompted for your token, paste-in the access token and hit ENTER.
Next, you download the llama7-7b tokenizer files to /shared/llama7b_tokenizer by running the following python code:
Next, download the RedPajama-Data-1T-Sample dataset (a small subset of the full RedPajama dataset that contains 1B tokens).
While still connected to the CLI pod, use git to download the dataset
Tokenize the dataset
Tokenize the dataset using the preprocessing script included with neuronx-nemo-megatron. This preprocessing step will take ~60 minutes to run on a trn1.32xl instance.
Modify dataset and tokenizer paths in the training script
Note: When we later launch our training jobs in EKS, the training pods will run the training script from within neuronx-nemo-megatron/nemo/examples directory on FSx. This is convenient, because it will let you modify your training script directly on FSx without requiring that you rebuild the neuronx-nemo-megatron container for every change.
Modify the test_llama.sh script /shared/neuronx-nemo-megatron/nemo/examples/nlp/language_modeling/test_llama.sh to update the following two lines. These lines tell the training pod workers where to find the Llama tokenizer and the dataset on the FSx filesystem.
Run:
Before changes:
After changes:
You can save your changes in nano by pressing CTRL-X, then y, then ENTER.
When you are finished, type exit or press CTRL-d to exit the CLI pod.
If you no longer need the CLI pod you can remove it by running:
We are finally ready to launch our pre-compilation and training jobs!
First, let’s check to make sure the MPI operator is functional by running this command:
If the MPI Operator is not installed, please follow the MPI Operator installation instructions before proceeding.
Before we can run the training job, we first run a pre-compilation job in order to prepare the model artifacts. This step extracts and compiles the underlying compute graphs for the Llama-2-7b model and generates Neuron executable files (NEFFs) that can run on the Trainium accelerators. These NEFFs are stored in a persistent Neuron cache on FSx so that the training job can later access them.
Run pre-compilation job
Run the pre-compilation script
Pre-compilation will take ~10 minutes when using 4 trn1.32xlarge nodes.
Periodically run kubectl get pods | grep compile and wait until you see that the compile job shows ‘Completed’.
When pre-compilation is complete, you can then launch the pre-training job on 4 trn1.32xl nodes by running the following script:
Run training job
View training job output
To monitor the training job output – first, find the name of the launcher pod associated with your training job:
Once you have identified the name of the launcher pod and see that it is ‘Running’, the next step is to determine its UID.
Replace test-mpi-train-launcher-xxx with your launcher pod name in the following command and it will output the UID:
Use the UID to determine the log path so you can tail the training logs. Replace UID in the following command with the above value.
When you are done viewing the logs, you can press CTRL-C to quit the tail command.
Monitor Trainium accelerator utilization
To monitor Trainium accelerator utilization you can use the neuron-top command. Neuron-top is a console-based tool for monitoring Neuron and system-related performance metrics on trn1/inf2/inf1 instances. You can launch neuron-top on one of the worker pods as follows:
View training job metrics in TensorBoard
TensorBoard is a web-based visualization tool that is commonly used to monitor and explore training jobs. It allows you to quickly monitor training metrics, and you can also easily compare metrics across different training runs.
TensorBoard logs available in the /shared/nemo_experiments/ directory on the FSx for Lustre filesystem.
Run the following script to create a TensorBoard deployment so you can visualize your Llama-2 training job progress:
Once the deployment is ready the script will output a password-protected URL for your new TensorBoard deployment.
Launch the URL to view your training progress.
When you have opened the TensorBoard interface, choose your training job UID from the left-hand menu, and then explore the various training metrics (ex: reduced-train-loss, throughput, and grad-norm) from the main application window.
Stopping the training job
To stop your training job and remove the launcher/worker pods, run the following command:
You can then run kubectl get pods to confirm that the launcher/worker pods have been removed.
Cleaning up
To remove the resources created using this solution, run the cleanup script:
About Digital Alpha
Digital Alpha partners with RIAs, broker-dealers, and wealth management firms to design and implement technology strategies that drive operational efficiency and enable growth. Our integration-first methodology grounded in the 2025 Kitces research ensures that AI and automation investments deliver measurable results. Programs available for firms from $500M to $20B+ AUM, with production-ready implementations in 30–90 days.
Learn more: digital-alpha.com/capital-markets