Introduction
In today’s data-driven world, seamless data integration is crucial for businesses striving to harness the power of their data. Whether it’s consolidating data from multiple sources, ensuring data consistency across platforms, or preparing data for advanced analytics, an efficient data integration tool is a game-changer. This is where Airbyte comes in. As a powerful, open-source data integration platform, Airbyte makes it easy to sync data from any source to any destination. In this blog, we’ll explore the capabilities of Airbyte, its potential use-cases, and how you can leverage our AWS Marketplace products to streamline your data integration processes.
For more detailed information and knowledge regarding Airbyte and Data Integration, refer to out blog Effortless Data Integration using Airbyte.
Get Started
Get started with our Enterprise Marketplace offering in under 20 mins.
How to Access our product?
To access our Data Integration solution, please visit the AWS Marketplace offering of our product.
The deployment of the product involves these steps:
- Subscribe to Marketplace product
- Select the Fulfillment Method according to the needs (We offer Dedicated-Private-VPC and Private-Existing-VPC methods)
- Enter all the required details asked in the CloudFormation UI and create the stack.
Subscribe to our AWS Marketplace product:
Our product comes in the AMI + CloudFormation delivery method, in which the whole infrastructure is made using CloudFormation and the Software comes in an EC2 instance.
Follow these steps to subscribe to our product:
- Visit this AWS Marketplace offering page and Click on Continue to subscribe.

- Some Terms and Conditions are shown. Review and accept them.
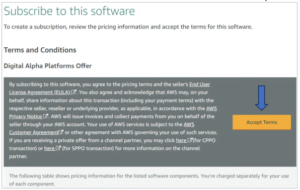
- Pending Subscription. Wait till it gets activated.
- After activation, configure the software. We provide this solution in 2 Fulfillment methods:
- Private Dedicated VPC (Recommended).
- Private Existing VPC.
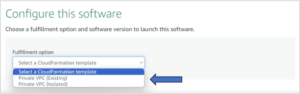
- Choose the Fulfillment method and region (us-east-1 only currently).
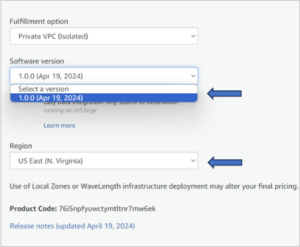
- Click on Continue to Launch.
- Choose the action as Launch CloudFormation and click Launch.
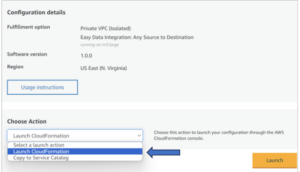
- You will be redirected to the CloudFormation console.
Understanding the Fulfillment Methods
We are providing 2 Fulfillment methods for our solution:
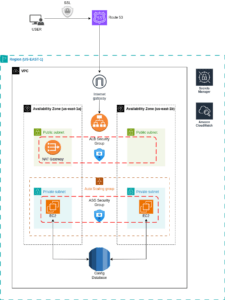
- Private Dedicated VPC (Recommended): This Delivery method is designed to meet your internal security requirements. Below are the created resources:
- Automated VPC Setup: Our CloudFormation template automates the creation of a dedicated VPC, subnets, route tables, and necessary networking components, ensuring a secure and isolated environment for your application. (2 Public and 2 Private subnets).
- Config DB in RDS: For the application to use the same database for all the new EC2s created as part of the Auto Scaling Policies, a PostgreSQL-based RDS instance is created, all the configs of the Application are stored in that DB.
- Auto Scaling Group: The template provisions an Auto Scaling group configured with dynamic scaling policies based on CloudWatch alarms for EC2 CPU utilization, ensuring your application can efficiently handle varying traffic loads.
- Application Load Balancer (ALB): An ALB is set up to distribute incoming traffic across multiple EC2 instances, improving reliability and fault tolerance of your application.
- SSL Certificate Support: Easily configure SSL certificates for your domain, enabling secure HTTPS connections for your application. Simply provide the necessary SSL certificate details, including sub-domain and Hosted Zone ID, for seamless integration.
- Optional SSL Configuration: While SSL certificate setup is optional, it’s recommended for ensuring secure communication between clients and your application.
- Custom Domain Support: You can specify a custom domain for your application, allowing you to showcase your brand and provide a more professional experience for your users.
- Default Auth Mechanism: While launching the CloudFormation template, the user must enter the Username and Password for the Application and the Config Database. Which are then stored in the Secrets Manager for future accessing.
- Pricing: This architecture bills around $160 per Month, see this estimate. (Additional charges may occur according to the usage of Route 53 and ACM, which are optional in this architecture).
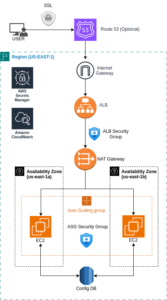
- Private Existing VPC: A cost-saving architecture of the above fulfillment method, which uses your existing infrastructure to create the whole application. Below are the created resources.
- Integration with Existing Infrastructure: Leverage your existing VPC and subnets by providing their details during setup, ensuring seamless integration with your current AWS environment.
- Flexible Networking Configuration: With the ability to input your existing VPC and subnet details, you have full control over the networking configuration, allowing you to align the setup with your specific requirements.
- Config DB in RDS: For the application to use the same database for all the new EC2s created as part of the Auto Scaling Policies, a PostgreSQL-based RDS instance is created, all the configs of the Application are stored in that DB.
- Auto Scaling Group Setup: The CloudFormation template provisions an Auto Scaling group within your existing VPC, enabling dynamic scaling of EC2 instances based on CPU utilization, optimizing resource utilization and performance.
- ALB Integration: Integrate an Application Load Balancer into your existing VPC setup to efficiently distribute incoming traffic across your EC2 instances, enhancing reliability and availability.
- Optional SSL Support: If desired, configure SSL certificates for your custom domain to enable secure HTTPS connections for your application. Simply provide the necessary SSL certificate details for seamless integration.
- Enhanced Security: By utilizing your existing VPC infrastructure, you maintain the security and isolation benefits already established within your AWS environment.
- Default Auth Mechanism: While launching the CloudFormation template, the user must enter the Username and Password for the Application and the Config Database. Which are then stored in the Secrets Manager for future accessing.
- Pricing: This architecture bills around $120 per Month (Assuming that a NAT Gateway is provided by the user). (Additional charges may occur according to the usage of Route 53, ACM, which are optional in this architecture). Refer architecture below:
Filling the CloudFormation
Private Dedicated VPC (Recommended):
- Stack Name: The stack name should not exceed 12 characters.
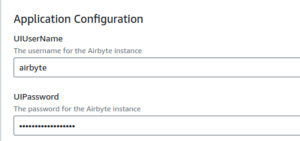
- Application Configuration: This section contains the credential details
- UIUserName: This expects a username for the application.
- UIPassword: This expects a password for the application. We suggest you keep a strong and unique password for the security of the application.
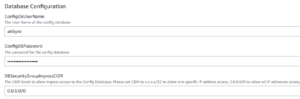
- Database Configuration:
- ConfigDBUserName: This expects a name for the config database. A database of the given name is created.
- ConfigDBPassword: This expects the password for the config database. We suggest you keep a strong and unique password for the security of the application.
- DBSecurityGroupIngressCIDR: This expects a CIDR value for the Database Security Group’s Inbound rule, which applies for ports 80 and 443. Users can give 0.0.0.0/0 for easy accessibility.
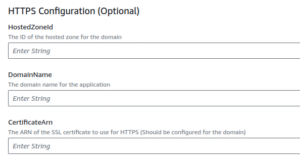
- HTTPS Configuration: This is an optional field and should be considered if you want to have a custom domain name with a secured SSL connection.
- HostedZoneId: The HostedZoneId where the subdomain will be created.
- DomainName: This expects a Domain name with which the application can be accessed. You can use this name in your browser to access the solution
- CertificateArn: This expects the ARN of the SSL certificate. This enables the solution to be accessed with HTTPS.
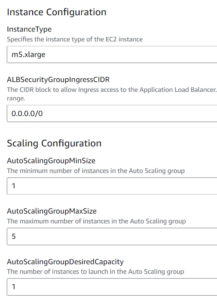
- Instance and Scaling Configuration: This contains the details of the EC2 instance. We recommend using the default value for optimum performance.
- Instance Type: This expects the Instance type of the EC2. We suggest m5.xlarge type to ensure performance and t3.xlarge for saving costs.
- ALBSecurityGroupIngressCIDR: This expects a CIDR value for the Application Load Balancer Security Group’s Inbound rule, which applies for ports 80 and 443. By Default, ALB is running on Public Subnets. So, it is advisable to have it as 0.0.0.0/0 if there are no regulations. Otherwise, the internal network’s CIDR can also be given.
- AutoScalingGroupDesiredCapacity: This expects the desired capacity of the Auto Scaling Group.
- AutoScalingGroupMinSize: This expects the minimum number of instances to trigger Auto Scaling Group.
- AutoScalingGroupMaxSize: This expects the maximum number of instances to trigger Auto Scaling Group.
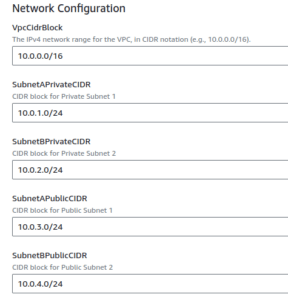
- Network Configuration: This contains the details of the Network parameters that form the infrastructure. All the parameters expect CIDR notation; an error will be caused if it is incorrect.
- VpcCidrBlock: This is the IPv4 network range for the VPC
- SubetAPrivateCIDR: IPv4 address of the Private Subnet 1
- SubnetBPrivateCIDR: IPv4 address of the Private Subnet 2
- SubnetAPublicCIDR: IPv4 address of the Public Subnet 1
- SubnetBPublicCIDR: IPv4 address of the Public Subnet 2
Private Existing VPC:
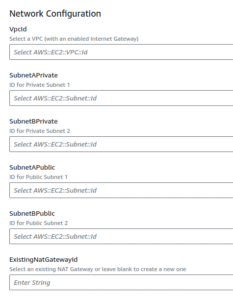
In the Private Existing VPC setup, all parameters except network configurations remain identical to the Private Dedicated VPC setup. The Network Configuration details are shown below:
- Network Configuration: In the Private Existing VPC setup, all parameters except network configurations remain identical to the Private Dedicated VPC setup. The Network Configuration details are shown below:
- VpcId: Select the VPC (by ID), in which the application launches
- SubetAPrivate: Strictly select the First Private Subnet (by ID) here. (Error may occur if Private Subnet is not selected)
- SubnetBPrivate: Strictly select the Second Private Subnet (by ID) here. (Error may occur if Private Subnet is not selected)
- SubnetAPublic: Strictly select the First Public Subnet (by ID) here. (Error may occur if Public Subnet is not selected)
- SubnetBPublic: Strictly select the Second Public Subnet (by ID) here. (Error may occur if Public Subnet is not selected)
- ExistingNatGatewayId: Enter the ID of the NAT Gateway, if there is one already created in the above selected VPC. Leave it empty if you do not have it, the CloudFormation template will create it.
Important Notes
- Secrets Management: User-provided usernames and passwords for both the application and configuration database are securely stored as secrets within AWS Secrets Manager, seamlessly integrated into the CloudFormation template. This ensures that sensitive credentials are safeguarded and easily manageable, enhancing the overall security posture of the deployment.
- Take RDS Database Snapshots: Taking regular snapshots of our RDS PostgreSQL database is essential. These snapshots capture critical details like connections, source and destination information, catalogs, and sync history. They serve as a vital safety net, enabling swift restoration of operations in case of downtime. This proactive approach safeguards our progress and minimizes data loss, ensuring uninterrupted operations.
- HTTPS Configuration: Enabling HTTPS configuration, while optional, requires domain configuration. If the domain isn’t configured in AWS Route 53, users can import it. They need to provide the HostedZoneId and the full domain name. The configuration operates in two modes:
- Without Certificate ARN: The RecordSet attaches to the ALB endpoint at HTTP, operating on port 80 without an SSL certificate.
- With Certificate ARN: Users can provide a certificate ARN, ensuring secure HTTPS communication. The certificate should be configured for the specific domain or its sub-domains within the HostedZone, enabling HTTPS listener on ALB port 443 for end-to-end encryption.
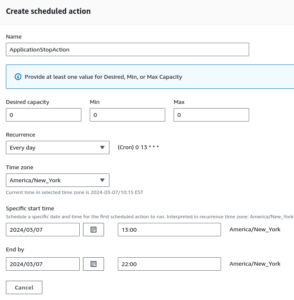
- Scheduled EC2 Instances: For users requiring EC2 instances to run only during scheduled application jobs, setup is simple. Navigate to the Auto Scaling page, select the Auto Scaling Group (ASG), and configure scheduled actions within the Automatic Scaling settings. This feature allows for efficient resource utilization, ensuring instances are active only, when necessary. Refer to the image for visual guide:
- Clean Up made simple: When finished with their tasks and confident in data backups, users can delete the entire CloudFormation Stack from the console UI. Select the stack by name and click delete. Note: Deletion may fail if there are explicit dependencies. In such cases, delete dependencies first, then stack. This streamlined process ensures efficient resource management and system cleanliness.
About Digital Alpha
Digital Alpha partners with RIAs, broker-dealers, and wealth management firms to design and implement technology strategies that drive operational efficiency and enable growth. Our integration-first methodology grounded in the 2025 Kitces research ensures that AI and automation investments deliver measurable results. Programs available for firms from $500M to $20B+ AUM, with production-ready implementations in 30–90 days.
Learn more: digital-alpha.com/capital-markets